Tuesday, March 26, 2019

mysimpleshow (Cult of Pedagogy)

     The Cult of Pedagogy Blog posted about mysimpleshow a couple years ago, but I'm just now discovering it. Mysimpleshow is similar to GoAnimate and Powtoon, because you are able to create videos that include animation and audio. What makes it different, is that it makes the process of creating a video quicker and easier.
Google Images

     When creating a mysimpleshow, you first upload or write a script from scratch. If you are writing your script from scratch, it will ask you what your topic is. You click on your topic and it will give you a script template. Then you can type in your text. Also, you are able to upload your script through PowerPoint. Once uploaded, it extracts the most important information, but still allows changes to be made.
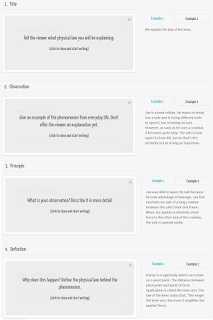
Script Template (from Cult of Pedagogy)

     After a script has been uploaded, mysimplestory reads the script, picks out key words, and find images that you can use in your video. If the pictures it finds don't match up with what you want, there is a search bar that you can use to find your own images. Also, you can upload your own pictures. You are able to resize, flip, and put affects on the pictures you use.
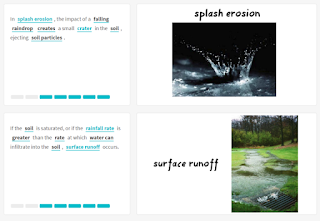
From Cult of Pedagogy

     Once you have pictures chosen, you will be able to publish your video. To publish, you click on the "finalize" button. The finished video will have narration, soft background music, and the images will be timed to match the script. This is possible because the images are linked to a key word in the script. When that word is read, the image will appear.

     Finished videos are stored in the mysimpleshow library. Also, they can be uploaded, downloaded, and saved.

     Some possible uses for mysimpleshow:

  1. Teaching chunks of content
  2. Tutorials for classroom procedures
  3. Introductory video for students and parents
  4. Introduction to a topic
  5. Students create videos about a topic (instead of using PowerPoint)
     I have tried Powtoon and it took me forever to make a video. I'm definitely willing to try out mysimpleshow. Also, my school's subscription to BrainPop and BrainPopJr. just ran out, so this would be a great way for me to create short, informational videos for my students. This would be a wonderful tool for students to use as well!

CoSpaces: 3D Creations

     During a faculty meeting, a coworker presented information she learned from an ELA professional development she went to. I received a handout that gave examples of how to get students to produce quality work that can be put in their Backpack of Skills. All of the examples given incorporated technology and how to encourage higher order thinking. For example, instead of decorating a bottle or pumpkin to explain the theme of a book, students could create a CoSpaces environment for the theme of their book. I had never heard of CoSpaces before so, I decided to go home and research it.

Google Images
     I learned that CoSpaces allows students to develop 3D creations that they can animate using code and view in virtual or augmented reality. The key features of CoSpaces are:

     Creation Tool Box: Students can choose the environment, characters, buildings (which they can build from scratch using geometric shapes), natural elements, animals, and transportation. This feature, basically, helps set the stage for the student's creation.

 
     Coding Features: The programming language for students is very basic and meant to beginners. If you have an advanced coding student, you can upgrade to scripted coding. This feature is meant to allow students to have their characters move. Students can select a drop down box and choose the character or object that they want to move, then they can choose how many degrees they want it to move, which direction, and how many times they want that motion to be repeated. Also, if they have a character that they want to talk they choose the character and select what they want it to say.

Google Images

     Virtual Reality: Can use a Google Cardboard (Virtual Reality Goggles) to view the environment created. This is possible because CoSpaces enables creations to be exported, which means it can be accessed on a smartphone.

Google Images

     Augmented Reality: Creations can be projected on to any surface with the CoSpaces mobile app and devices with AR Core. This feature overlaps reality and the 3D environment.

Google Images

     Class Management: Teachers can observe and monitor student progress on the dashboard

Google Images

     This tech tool would be a great to have students incorporate into their projects and presentations. You could have students create an important scene from a book or history. I would recommend this for older students who would be able to work independently and understand the purpose of each feature.

Wednesday, March 20, 2019

Sown to Grow (Cult of Pedagogy)

     Jennifer Gonzalez, the creator of the blog Cult of Pedagogy, wrote an interesting post about the tool Sown to Grow. This tech tool is a way for students to set goals and track their progress towards meeting them. It caught my attention because we all want to foster a Growth Mindset within our students and we want them to take ownership of their learning. What I've always struggled with was coming up with a way to do that. I've been looking for a way for students to track their own progress in mastering content. Sown to Grow seems like a great way to do that.


     There are certain features that Sown to Grow offers that make it a prime way to have students set and monitor goals.

  • Creating a Learning Cycle- This is your first step. You set a time limit for when learning objectives should be met. Also, you assign activities that either get a numerical score or a completion score. 
  • Students can check-in- When students log in they see the learning objectives and are asked how they feel about the upcoming learning cycle.
  • Goal Setting- Students set their own goals. They decide if they want to get close to the mastery goal, meet it, or exceed it.
  • Tracking Progress- Once students set their goals, then they work on the tasks. As they complete a task they record their scores and reflect on how they did. 
  • Final Reflection- Students reflect on how they did and what their goals might be next time. It shows them what they mastered and how many goals they met. Then they click the appropriate smiley face to indicate how they feel about their progress. 

  • The teacher can, also, track the entire classes progress by looking at the Student Performance Data and Student Performance Summary.

     I really like how it encourages them to reflect on their progress and use that to set goals for the next learning cycle. I don't think this is something that you could just put your kids on and let them figure out by themselves though. Younger students, especially, will need to be shown how to complete each step and have guidance when logging on the first few times. I may give this a try next year. If you want to watch an information video, click below:


Story Maker from ABCya.com

     My Kindergarten Kiddos have been working on their opinion writing piece for a little bit now. I decided to incorporate the use of a program that would allow them to practice using typing skills, which they will definitely need in the future. I thought having them type it would allow them to practice becoming more familiar with the keyboard. I wanted them to be able to draw a picture to go along with their writing piece, but I was worried that using a program like Microsoft Word would make that impossible. After reflecting back on last year, I remembered that I had my kids use Story Maker from ABCya.com.


     Story Maker allows the student to type on primary writing lines and has a space for a picture at the top. If they want, students can draw their picture on the computer. The drawing feature reminds me a lot of Paint. When students first get on Story Maker it has them type in their name and puts their name on the document for them. From there, students can click on the writing lines with their mouse and begin typing. Most of my students did really well typing, but remembering how to make a letter a capital seemed to be the hardest part. Once students are done typing, they can draw a picture or you can click the print icon and print it out. I chose to print my students pieces out and have them draw their own picture with crayons. They turned out great! Were they perfect, no, but my kids typed them completely on their own, which I was so proud of.


Drawing Feature

     To get to Story Maker, you go to ABCya.com and click the search sign. It's quicker to find it if you just search for it. Once you click on search, you type in Story Maker and it will come up. This isn't my first time using Story Maker and it won't be my last. It's a great writing/typing tool to use for primary students. My kids enjoyed it and were proud of the end result! I definitely recommend using this with your students.
   

Tuesday, March 12, 2019

Shmoop (Cult of Pedagogy)

     I discovered Shmoop when I went digging way back into the Cult of Pedagogy blog by Jennifer Gonzalez. Jennifer Gonzalez described Shmoop as "...Cliff Notes with more zing." Shmoop offers original content on subjects from Shakespeare to calculus, as well as, test prep and career guidance. Shmoop is centered on humor content depth. Shmoop offers many videos on a variety of subjects. The videos are usually animated with audio, and are very engaging due to their quirkiness and humor. Here is an example of a Shmoop video:


     The videos are fun and interesting to watch, but that is not where the content depth comes in. Shmoop offers free learning guides that include many topics. They even have a DMV Guide that provides driving information based on the users state. The example that Jennifer Gonzalez used was the topic infectious diseases. When she search those key words, Shmoop pulled up related tabs on terms, latin roots, infectious diseases in the real world, study questions, quizzes, and related websites. 
     
     Also, it has an essay lab where students can brainstorm, write, and edit sections of their essay. It, also offers step-by-step help on writing an argumentative essay, literary analysis, and college application essays.   

     Finally, it offers free online flashcards for students to quiz themselves with. The flashcards are pre-maid. 

     The paid materials are teacher guides, test prep, online courses, and Shmoop for schools. Personally, Shmoop sounds pretty interesting to me.

Infographics

     I'm currently trying to plan a science project for my kids about the states of matter. I wanted it to be something that could be completely their own and represent each of their understandings. I decided that having them create an infographic would be a great way to show their understanding of solids, liquids, and gases.
      My idea is to have them brainstorm examples of the three states of matter (at least three of each), and use pictures of those examples on their infographics. Their infographic would have a title, like Solids, Liquids, and Gases, and pictures that are labeled with the state of matter they are. They would have complete control over the pictures, font, and layout they use. To accomplish this I needed to find a tech tool that would be easy for my students to use. I looked up some tools that can be used to create infographics and they are below:

  1. Canva- This tool has a specific tab for infographics. You can choose your template, font, and pictures. There is a search tab that allows you to search images on Canva and you can drag and drop the pictures where you want them. I love that you don't have to leave Canva to search for other pictures, save, and then download them. It can all be done on one webpage. Also, this tool is free.
  2. BeFunky- The choices for templates are limited on the free version, but you can still change the font, and choose pictures. You search for a picture, click on it, and it moves it into the image manager tab. From there you can drag the picture onto your infographic. This tool is free.
  3. Visme- This tool does the same things as Canva and BeFunky, but it has an additional feature. Visme allows you to add audio to your infographic. This tool is free.
  4. Piktochart- This tool has the same features as Canva and BeFunky. It has quite a few options for free templates. You are able to search for pictures within Piktochart. Once you find one, you click on it and it places it on your infographic, then you can adjust it. This tool is free.
  5. Animaker- This tool can be used if you want to shake up infographics. Animaker allows you to create video infographics that move and have audio. The only downside is that it is not free.
     I'm think of using Canva because I'm familiar with it already, and this is the first time that my kids are making an infographic. If you have used one of the other tools on the list let me know how it went!

Tuesday, March 5, 2019

Khan Academy Mastery System (Cult of Pedagogy)

     I recently posted about Khan Academy and how I have been playing the videos for my students, to supplement math instruction. While reading the article, "How Khan Academy is Bringing Mastery Learning to the Masses" by Jennifer Gonzalez, I learned about a feature called Mastery System. Mastery System isn't brand new, but there are new features.

     Mastery System is a new system that allows students to go beyond just watching videos and working on practice problems. Now students can take full courses online. They are able to measure their progress as they go, earn mastery points, reach new skills levels, and complete challenges. Students will be able to take courses and learn at their own pace. There is not pressure to go through a unit, take an assessment, and move on whether you mastered it or not. Students work to master a topic and then they move on. Students are given as many chances as it takes for them to pass a skill. Teachers and students are able to see which skills have been mastered and which are still being practiced.

Mastery System Challenge

     It is important to stress, that this is not a replacement for the traditional classroom experiences. It is recommended to use as a supplement to instruction. Where it is beneficial for teachers, is that is can help correct confusions that a student has about a skill with a short video. This can leave teachers more time to do deeper interventions or higher order tasks, such as Project Based Learning, simulations, etc.
     According to Gonzalez, "In a study where students consistently did 30 to 60 minutes of mastery learning practice every week, student growth in math was 33% or higher than those who did less than 15 minutes per week." The available Mastery System Courses are: 


  • All math courses from kindergarten through college
  • Physics and Biology
  • AP U.S. Government and Politics
  • Microecomomics
  • Macroeconomics
     This all sounds great, but I think would have trouble deciding how to structure my schedule in order to have time for students to use the Mastery System. If you have any suggestions, let me know. Also, if you would like to watch an information video regarding the Mastery System click below.


My Thoughts on Bloomz Communication App

     Bloomz is a communication app that I talked about a little earlier in my blog. I've just now started using Bloomz. Just to recap, Bloomz allows you to send reminders, create calendar events that will send a reminder, organize volunteer and item sign ups, organize parent/teacher conferences, send private messages to parents, create photo albums, and create individual student albums to showcase great work. I previously used Remind, but I have to say, so far, I prefer Bloomz.
     Remind is great for sending class or individual announcements, but Bloomz is a way to create a classroom community and make parents feel like they are a part of it. It think it is wonderful that you are able to create picture albums of your students. For example, I created a Field Trip and 100th Day of School album. It great because many parents were not able to come, but they can still see all the fun that happened that day. Also, I love that you can place pictures of student work into individual student albums. I think this is going to be a great motivator for students to work hard to produce completed, neat, and correct work. I plan on introducing this feature by taking a picture of the students that pass their spelling test each week. I've been having a little trouble getting some students to study their words at home and complete their spelling homework, so hopefully this will excite them and make them want to do those things.
    Another feature that I wasn't aware of at first, is the notification feature. Even if parents/guardians don't sign up directly on the app, if you invite them through email, it will automatically send them reminders. If it is an event, sign up, or message that you want everyone to see (no matter whose signed up on the app) you can click "notify everyone" and it will send the message through the app or and email.
     The only downside is, to have access to all features you have to pay $7.99 a month. For example, to be able to view the calendar monthly or weekly you have to pay the fee. Right now, myself and parents only view it in basic view. Which lists the events in the order that I put them in. It's not as convenient, but I can live with it. Also, to have access to the reports tab you have to pay. The reports tab shows you how many parents/guardians have signed up/volunteered and viewed the albums and messages. This feature isn't one that I desperately need, so the free version of Bloomz is still great for me.
     Overall, I'm excited to continue to use Bloomz and create a positive and welcoming classroom environment.!
   

Sunday, March 3, 2019

Microsoft Teams (Cult of Pedagogy)

     While searching through the Cult of Pedagogy Blog by Jennifer Gonzalez, I was introduced to a tech tool that I had never heard of.
At first, I compared it to Google Docs, where students can collaborate on the same document by sharing it through email addresses, but it has many other features. Microsoft Teams allows for communication and collaboration between teachers and students, assignments to be shared and given feedback on, and for students to use apps that are outside of the Microsoft world. Below is the break down of features:

Communication and Collaboration

  • Teachers can send reminders or announcements to individual students or the whole class.
  • Individual users can chat privately with other users.
  • Users can have video chats, using the built in Skype feature and participate in class discussions using Flipgrid. 
  • Teachers can use One Note Class Notebooks to share notes and files, as well as, give feedback to students. 
Giving Feedback

Assignments
  • Teachers can create, assign, and give feedback on assignments. 
  • Attach relevant files (e.x. word, powerpoint, excel, etc.) that you are wanting students to use.
  • Create, save, and use rubrics to assess student work. There is a built in rubric generator.
Creating a rubric

App Integrations
  • You can use some of the most popular apps within Microsoft Teams.
  • You can use Kahoot!, Nearpod, Quizlet, and Flipgrid.
  • If an app is regularly used you can add a designated tab just for that app. 

     This app makes collaboration and communication seamless because you will not have to go back and forth between pages on your browser. Everything you need would be available within Microsoft Teams. I can see myself using this tool with my colleagues. It would be a great way to collaborate on lesson plans, PLC documents, student assessments, etc. If you want to learn more about Microsoft Teams, check out the video below:


Tools to Help Students Follow Their Passions (Cult of Pedagogy)

     Jennifer Gonzalez posted way back in 2015 about tools to help students follow their passions. These "passion tools" (as she c...